
The following is a step by step guide to building an armature for people-shaped sculpting projects. And a lot of this would be transferable to animals and monsters as well! The tools required to take on this project are:
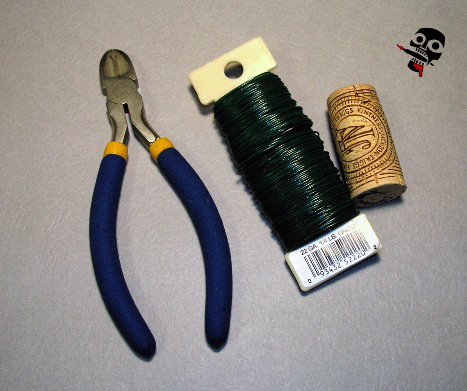
Here's your stuff, all together. Also required would be two pairs of pliers, which will be shown below. I chose 22 gauge wire because it was relatively easy to bend, resilient (you can bend it a lot without having it break), and it is also relatively sturdy. Try out different gauges and types though, and find your favourite.

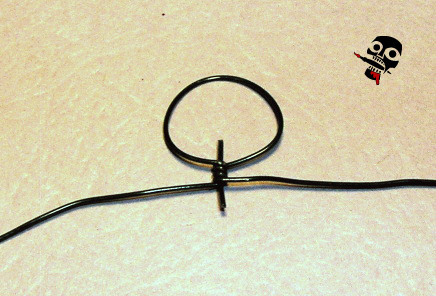
Cut a liberal length of wire (20cm should be more than enough) and straighten it out. Find the middle spot and twist it around your index finger so that it is a circle for 15mm armatures. For 28mm armatures, twist it around the index and middle finger, as you will need more length of wire for the arms. (Note that the little piece of wire in the picture there isn't part of this step, it just happened to be on the desk when I took the picture! How did I not notice it when I originally took the picture?)

Once you have your circle, cut a little piece of wire that runs about two times the height of the body (chest, butt, head) of the planned fig (If you have too much length you can cut it, if it's too short, you have to start over! I have these left over from previous armatures I made). This little wire will be the peg for the head and the internal part of the body. Place it in between the two wires as they come together in the loop as show above (the wire tension should hold it in place).

So, take some time to get a good grip on the part where the three wires come together. This is pretty important, you have to get a firm grip so nothing will slide, and make sure that the body wire piece is exactly at the point where the loop comes together, and make sure that your pliers are right at the edge of the loop, as you will be twisting around the body wire piece and you don't want to twist around the pliers!

So, this part can be done with your fingers, but you won't get as tight a wind. Either way, grab the wires that continue out from the loop in your fingers or with pliers and twist. For 15mm figs, I find that all you need are three twists. For 28mm figs you need around six. For this step, I find it best for me to do the first wind by hand, and then the remaining winds with the second pair of pliers.
Here is the finished 15mm armature just after twisting. The body peg sticks out the top (where the loop is) and the bottom. At this point, snip that bottom part, as you don't need a peg between the legs. The top peg will hold the head. Note that the peg looks too high for a realistic head... Don't cut it down! You will have to add putty to the shoulders, which will shrink the head peg... But this discussion is starting to get into the sculpting side, and this is an article about armatures! Just don't cut the head peg!
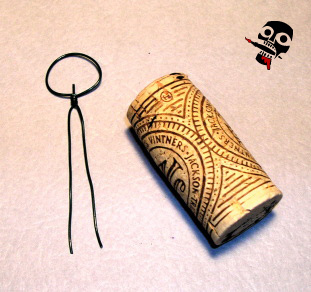
Now it is time to get it ready to put in the cork. Bend the 'legs' down, and straighten them so that they can be slid into the cork. To put it into the cork, start by just pushing it with your fingers, and then use a pair of pliers to work it in further. Note that the length of the legs in this picture is far too long. Snip those to just over half of the length they are in the picture.

So, push the armature down into the cork until you get it to the right height... Basically, the crotch should be in the center of the body. Keep in mind that you might be adding a base to the bottom of the fig that will make you want to leave extra length to the legs. But that's it, you're done! At this point you can snip the loop in the middle to seperate the arms, or sculpt the intire body (except the arms) before you snip it!

I find that once i make one armature, it is easy to make two, then three... And then make as many as you have the time and desire to make! So, of course, when a month goes by and it is time to make more armatures, I have forgotten exactly how I did it and it takes some trial and error to figure it out again :) Thus, the inspiration for this article! Since the same is true for all of the other stuff I do with sculpting stay tuned for more sculpting articles!