

Lothlorien in all its glory!
Like most of the other terrain projects that I have put a lot of time into, this one was dear to my heart. I always thought the elves were cool, and I had been planning to put an army of Lorien elves together for some time. But why the terrain project itelf? It all started when Envinyatar over at The Last Alliance sent me a few interview questions, and one of which asked if there were any projects I thought I couldn't do... Naturally I said that there was not a single project that I couldn't do, perhaps a bit rashly... So really, I asked for the challenge that he put to me shortly after I responded to the question: Build me some terrain worthy of the elves!
Where to start though? Should I go with Lindon, the Grey Havens? Sure, it would be easy, but there wasn't a lot of action there during the third age and it would look a lot like Gondor. What about Rivendel? Very cool indeed, and my heart was with those elves. I had wanted to do some elven stuff since I saw the prologue of the Fellowship of the Ring. But I had always really liked the Lorien elves. They looked cool and they saw action in PJ's version of the Lord of the Rings. Finally, with the release of the Fall of the Necromancer supplement and the excellent plastic wood elves I was determined to stick with Lorien.
So, Lothlorien it had to be. That wonderful and mystical place that Weta, with the help of Alan Lee, brought us home to in the Fellowship. I was dazzled and eager to begin. Of course, I also considered Mirkwood at this time. As fun as Mirkwood would be though, it was all underground and would take a lot more development on my part. So Lothlorien it was, and not just Lothlorien, but Caras Galadhon itself. The heart of elvendom on earth indeed!
Immediately I thought of an article I had seen in the US White Dwarf Magazine years ago. It was issue number 286, and it featured an elven tree city for Warhammer Fantasy. Although I scoffed at the project (as I had a habbit of scoffing at anything Warhammer Fantasy since my beloved Undead were split into Vampire Counts and Tomb Kings...) it still had more than a few great ideas on tree building that were, well, great and I could use them for my project. Also, doing a quick search on Mallorn trees, I cam accross an article on how to build them over on The Last Alliance. The article is called Mallorn Trunks by Nicolas Caron, and it is a good intro to Mallorn trees. You should really be confident that you could do that project before attempting this one!
The first thing here is to build the base. The tree is going to need to be sturdy. Thus, the larger and stronger the base the better. I used a piece of 3mm thick MDF that was about 50cm by 50cm (just under 2x2 feet). I may have been able to get away with a smaller base, but I didn't want to take any chances. The last thing I wanted was to finish the tree and have it be too wobbly, and thus have to re-base it! Also, a larger base meant that I could put on some nice scenic details that no Mallorn tree of Lorien should be without!

The base is cut and ready to go.
To avoid too much sanding, I always cut the edges of the MDF at an angle. Using a large linoleum knife (which is really just a large version of the hobby knife) as opposed to a small hobby knife makes this job much easier. I find that if I cut well, I don't have to sand at all, but it never hurts to smooth those edges. After cutting I drew a quick image of the spot the tree would be fixed, along with the accompanying hill that would surround it. The hill would serve a dual purpose: it would reflect the hilly image of lorien as is in the movies and it would also help support the tree! The latter being the most important I think.
The next step was to cut the styrofoam that would make up the hill. The main part of the hill was cut with a hobby knife. I also cut the basic structure for stairs into this as well, along with the circle for the tree trunk. I did both the stairs and the tree trunk circle with a hot wire cutter for precision. Once cut, it is time to detail. It is easiest to detail styrofoam before it is glued to the base, so don't leave it until later!

The styrofoam is cut and the trunk is fixed.
The only thing to detail at this point is the stairway. Cutting the stonework into the stairs structure is easy, and the method is outlined in my Building Umbar article. Cutting the slope on the hill is difficult. The key is to make it a gentle enough grade to allow a miniature to stand on it. I ended up cutting as much as I could with the hot wire cutter, then I moved to the hobby knife, and finally I just had to sand it. Sanding foam sucks. In the end though I ended up having to use plaster cloth to smooth out the curve enough to have miniatures stand on it anyway... Once the hill is done it is time to fix it to the base along with the tree trunk. I used all purpose white glue as it bonds MDF, styrofoam, and cardboard very well. Once the glue dries it is time to put the armatures for the tree branches onto the tree.

Everything we need to start building branches
is here: coat hanger wire and an old drill!
First thing we need to do is get the stuff together to start work on the branches. Here is where the wire coat hangers come in. To start, grab a couple of coat hangers, untwist them and straighten them out. Don't worry too much if you can't get them perfectly straight because fairly straight will do. We also need the drill for this as well as a roll of good masking tape. Once that is all together, we are ready to go.

Drilling the holes in the trunk.
First, mark the spot on the tree where the branches will go. It is a good idea at this point to mark all of the branches just so that you know how much work is ahead of you. Remember, try to put the branches more or less across from each other on the trunk. Don't worry, we can create more distinction in branch placement later by bending the wires. Once the branch locations are marked, it is time to start drilling. For the first branch, drill two holes in the general location of each branch about one centimeter apart. Next, drill two holes in the trunk directly opposite the first couple of holes you drilled. Then, thread one wire through one hole, into the core of the tree trunk, and then out the hole on the other side. Do this again for the second hole using the second wire.
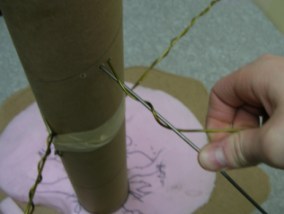
Twisting the wires for the branches.
Now you should have two wires pretty much side by side for each branch. Hold them in place and with a pair of pliars or your hands twist them together to form the armature. Once you get about 2/ 3 of the way toward the end of the branch stop. At this point you will need to use the ends or the wire to form a split in the branch. I did this by folding the remaining length of wire in half and twisting it.
Repeat this process for the rest of the tree. Note that the top of the tree might take a little fiddling, but it should come together in a similar way. You may be able to get away with fewer wires if done properly. By the end of this, you should have your basic tree structure, which is ready to be filled out.

Note how the wires were manipulated here to change the
relative
height of the branches.
Once all of the wires are in place for the branches, it is time to start filling
them out. It is important at this point to take a little time
to make sure the branches are in the right spot and are shaped the right way.
It may be worth considering exactly how structures will sit on the ends of the
branches at this point as well to make things easier down the line.
First you have to know what your trees should look like. One of the biggest mistakes I have made in the past is to simply forget to reference my reference material. Always look at the pictures you took/found/drew of your terrain constantly to ensure you are staying on track with what you want. Once you have a good idea, it is pretty straight forward to proceed with detailing the tree.

A great reference picture of the Mallorn trees made at Weta.
Now we want to fill out the tree to give it the general shape of the mallorn tree in the movies. This is done easily using flattened rolls of news paper. Make a few rolls that are the same height as the tree and flaten them slightly. Tape these using masking tape to the tree side by side. This will give the nice texture that the trees have in the movies.
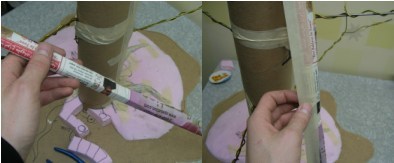
Adding shape to the tree is fairly straight forward. First roll
some newspaper and then tape it to the trunk!
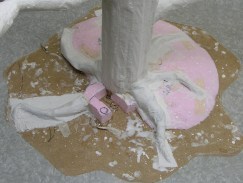
Once the trunk has its texture, it is logical to start putting roots on the tree. The more the better for Lothlorien, as the mallorns tend to have a lot of roots. To do this, simply make narrow cones by rolling newspaper, and then force them into the shape you want them and finally tape it to the base of the tree in a reasonable location. Repeat until you are satisfied that you have enough. You can also make different shapes and little underpasses with the roots if you like. All these little details will add to the character of your final piece.

The roots take shape.
Filling out the branches is a little more work. I really wanted to have very sturdy branches, so I decided to use cardboard instead of newspaper. In hind sight though, I would suggest that newspaper is fine, and it is a lot easier to work with! In either case, what you want to do is make sure that the support wire for each branch remains very close to the top of the branch. That is, don't wrap the news paper around it and allow it to end up in the middle, because then your branch's strength will rely almost entirely on the strenght of the newspaper and plaster. By keeping your wire near the top of the branch, the wire lends its strength also.
The branches are being filled out here.
The best way to fill out branches is to make some dense crumpled rolls of news paper and then tape them with masking tape to the bottom of the branch support wire. You could also use a cardboard tube, such as those from toilet paper rolls, and work that into the right shape, fill it with news paper, and put it on the branch wire so that it hangs from the metal armature. That is how mine were constructed. Repeat this process until you have the entire tree filled out and textured. Once it is all done, it is time to add the strength to the whole thing with plaster cloth!
It is worth noting that at this point you should be pretty happy with the general shape of the tree. Although the plaster does add texture to the surface of the tree itself, and can also be used to smooth some of the rinkles out, the general shape of the tree at this point is pretty much what you will have for the duration of the project. So, don't cut corners here, fix it up exactly the way you want it before it is too late!

The tree is now ready for plaster!
Now grab that Woodland Scenics Plaster Cloth and get to work! Although the plaster cloth is very user-friendly stuff, there are some interesting points to note about it. I found that the best way to apply it is in the longest, widest sheets possible. This way you don't have to worry as much about unsightly seam lines (and they can be very unsightly). Take my word for it, those seam lines are not easy to sand off! In the end I think I used three or four wide strips for the trunk itself (with holes cut out to accomodate the branches), and then used a single piece for each branch.

The plaster starts to go on!
Another thing worth noting is that you should always put the rough side of the plaster cloth facing out. The rough side of the cloth has the most plaster, so when you put it on you can spread that plaster around to cover up the cloth texture, which doesn't work all that well for mallorn trees :)
The final thing worth noting is that the more plaster you use, the sturdier your tree will be. I tried to get away with a single layer, but it just wouldn't work. Branches were a bit too loose and wobbly, and the surface still revealed the cloth texture. Unfortunately I had already primed the tree before I gave in and decided to add a couple more layers of the plaster cloth. Once that was done though, the tree was super sturdy.
The plastered roots.

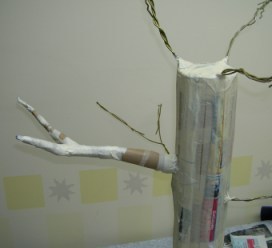
The tree, branches filled out and primed!
Once the plastering is done, It is time to add the fine branches that go at the end of the main branches. These fine branches are essential because we will attach all of our foiliage to them and they will essentially make the tree more tree-like. The process of adding them is pretty simple. First, you have to get some Woodland Scenics model tree armatures. I used the 1.9cm to 5cm tree armatures. Then, you take a sharp object such as a small round screw driver or a strong pen and you poke holes into the plaster where you want the armature to go. Then you stick the trunk of the armature into the hole along with liberal amounts of white (PVA) or hot glue. Repeat until you have covered the ends of the main branches pretty well. Try to keep these armatures near the ends of the branches, as you will be building structures onto the other parts of the branches.
Now it is time to paint! It is worth noting though that once you have gotten to this point, you have really done the most difficult work, so take a moment to bask in the glory of your creation! Anyway, first thing is to prime it. I always prime with black. Once that is done, start with a dark-medium gray and cover the whole tree. Next add some white so that it is noticably, but not too noticably lighter to make the first highlight. Then apply the highlight to the raised areas, leaving the sunken areas darker. Continue to lighten the mix and then highlight the highest of areas until you are happy with the gradient.

Adding foiliage to the tree.
At this point I didn't finish the base of the tree because there was still much to add to it. However, at this point it is pretty much done and ready to have all of the stairs and flets added to it. I will mention though the process of adding foiliage to the tree, although I would strongly recommend putting this off until the very end of your project, when all of the buildings are in place and everything is pretty much completely done. It is fairly easy to attach the foiliage. All you have to do is simply get some light green Woodlands Scenics clump foiliage and glue it to the branches that you put near the end of the large branches. I would recommend hot glue, but all purpose white glue (PVA) works as well.

The tree, painted and ready to have structures added!
Note I haven't added foiliage yet as I am wating to
add the structures first.
This project was so big, it won't fit into a single article! Please see the Building Lothlorien Elven Structures article for all the details. Also stay tuned, there will be at least a couple more articles on the way for this project! In the mean time, check out the Lothlorien terrain in the Lothlorien - Caras Galadhon gallery!